Mold in Your Keurig? Where It Hides, Why It Keeps Coming Back, and the 10-Minute Routine That Stops It
Where mold and bacteria grow in a Keurig, how to spot them, and the daily, weekly and quarterly routine that keeps your brewer clean.
Your Keurig is warm, damp, dark inside, and full of coffee residue. That is a near-perfect setup for mold, yeast, and bacteria. The good news: keeping it clean takes about 30 seconds a day, 10 minutes a week, and one 45-minute descale every few months. This guide covers where the growth actually happens, how to spot it, exactly how to clean every part, and the mistakes that quietly undo your work.
Why a Keurig Is Such a Good Home for Mold
Mold and bacteria need three things: moisture, warmth, and food. A Keurig supplies all three. The reservoir holds standing water at room temperature, the brew head stays warm and wet, and every brew leaves behind a film of coffee oils and sugars that microbes feed on.
This is not a theoretical problem. In a 2011 household germ study, NSF International had 22 families swab 30 everyday items, and the coffee maker reservoir landed in the top ten germiest places in the home, ahead of most bathroom surfaces (NSF). NSF’s Lisa Yakas later told USA Today that mold or yeast turned up in 50 percent of the reservoirs sampled, calling the tank “one of the dirtiest parts of the kitchen” when it is not cleaned regularly (Chicago Sun-Times / USA Today).
Pod machines specifically have been studied too. Researchers at the University of Valencia sequenced the sludge from the drip trays of ten single-serve espresso machines and found between 35 and 67 different bacterial genera per machine, dominated by Pseudomonas and Enterococcus in nine of the ten. When they tracked a brand-new machine from day one, it was fully colonized within about two months, and a plain tap-water rinse of the removable parts barely slowed the process down (Scientific Reports). The authors’ takeaway was blunt: rinse often, and keep the dirty drip-tray liquid away from everything else.
One more myth to retire: “the hot water sterilizes it.” University of Arizona microbiologist Chuck Gerba and NSF’s Yakas both say brewing heat can kill some germs, but neither considers it a substitute for cleaning. As Yakas put it, “why take a chance?” (Chicago Sun-Times / USA Today).
The Six Places Mold Hides
Work through these in order of how often they cause trouble.
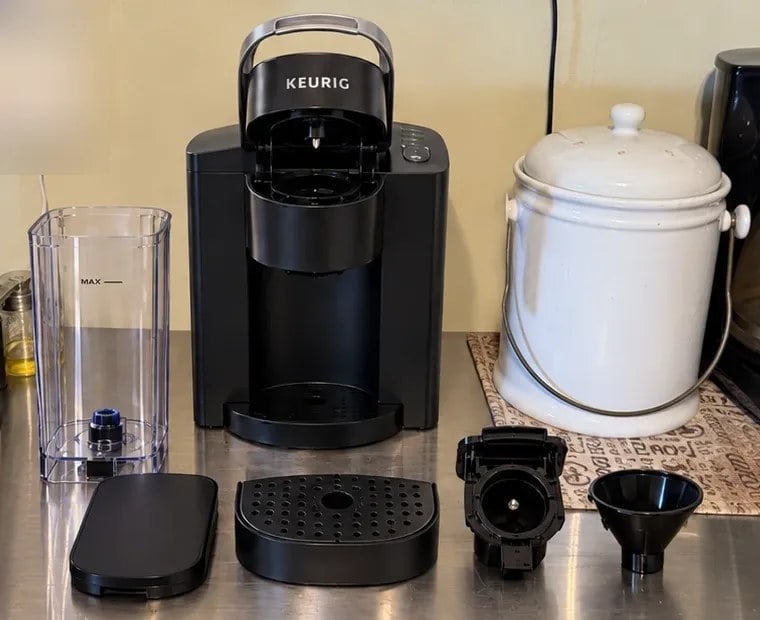
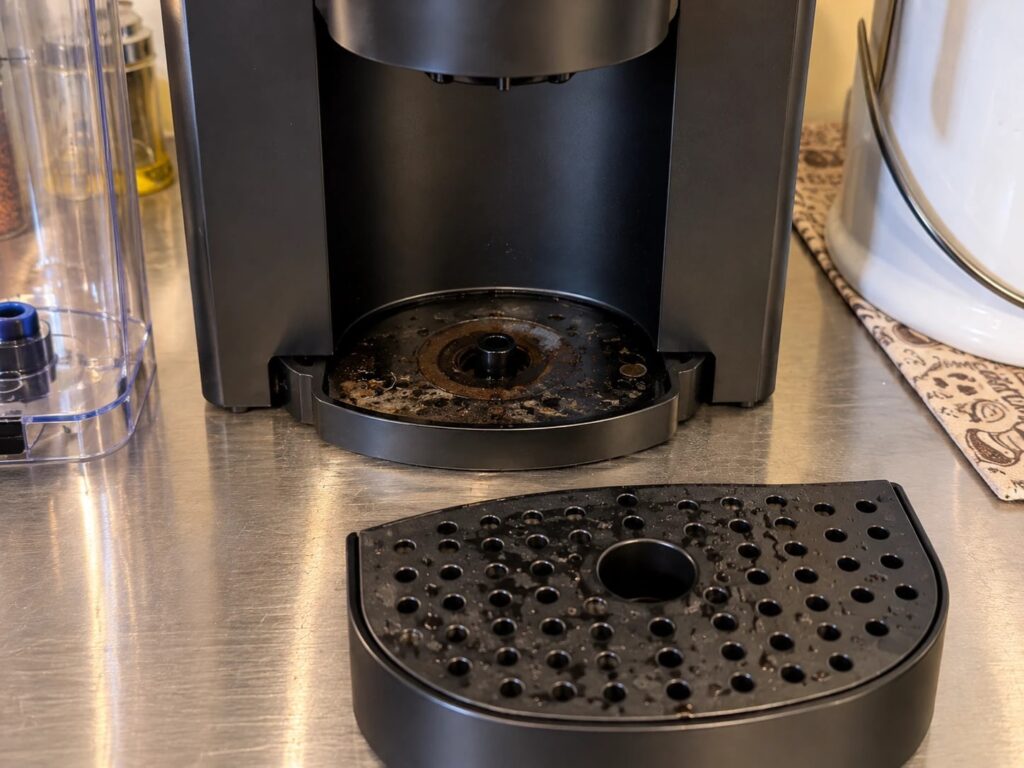
- The drip tray. It sits under every cup, catching drips, overflow, and splashes of sugary coffee. Tasting Table flags it as the single moldiest component, and Keurig’s own guides note it can hold up to 8 ounces of overflow (Tasting Table; Keurig K-Elite Use & Care Guide).
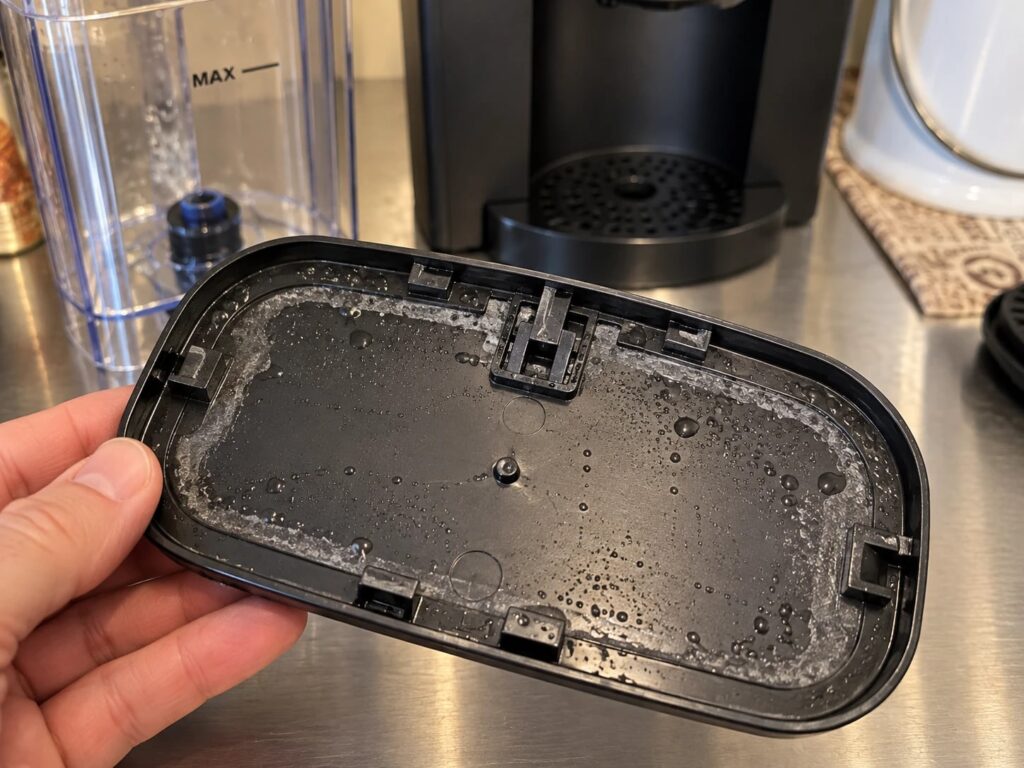
- The water reservoir and the underside of its lid. Standing water plus condensation under the lid. Look at the corners, the seam around the base, and the small filter screen at the bottom where water enters the machine.
- The pod holder and funnel. The cup that holds the K-Cup, and the funnel below it, stay wet and coffee-coated between brews. Used pods left sitting in the holder make it worse.
- The exit needle and entrance needle. Coffee grounds pack into the needle holes and hold moisture. Clogged needles also cause short cups and grounds in your coffee.
- The charcoal water filter cartridge. A damp charcoal block that never dries out. Tasting Table notes an overdue filter can harbor mold and give coffee a stale taste (Tasting Table).
- Reusable K-Cups. A mesh basket full of wet grounds left in a warm, dark brew head is a mold incubator. Guides consistently warn that a reusable pod left wet can start growing mold within a day or two (Capmesso; House Digest).
There is also a seventh area you cannot reach: the internal hot water tank and tubing. You cannot scrub it, which is exactly why descaling matters (more on that below).
How to Tell Your Keurig Has a Problem
You do not need a lab. Check for these:
- A musty or sour smell from the reservoir or the brew head when you lift the handle.
- Slimy film on the reservoir walls or under the lid. Run a finger along the bottom seam. If it feels slick, that is biofilm.
- Black, green, or fuzzy spots in the drip tray, on the lid, or inside the pod holder.
- Pink or orange slime. This is usually not mold but a common airborne bacterium called Serratia marcescens, which thrives in moist spots and shows up in toilets, showers, and pet bowls too (NDSU Extension). It needs the same fix as mold: scrub, dry, repeat.
- Floating flecks in the reservoir after you fill it. Could be scale, could be biofilm breaking loose. Either way, clean it.
- Off-tasting coffee, slow brews, or short cups. These are usually scale, which is not itself a health concern but creates the rough surfaces that mold and bacteria cling to.
Black specks in your actual cup are more often stray coffee grounds from a clogged exit needle than mold. See our guide: Coffee Grounds in Your Keurig Cup? 5 Causes and Fixes.
What Mold Actually Does to You
Keep this in proportion. For most healthy people, a grimy coffee maker means off flavors and maybe a stuffy nose, not a trip to the ER. But it is not nothing.
The CDC says mold exposure can cause a stuffy nose, sore throat, coughing or wheezing, burning eyes, or skin rash, and that people with asthma or mold allergies may have severe reactions. People with weakened immune systems or chronic lung disease can develop lung infections from mold (CDC). The FDA notes that food-borne yeast and mold can trigger sensitivity in people with allergies and can occasionally cause infections (Chicago Sun-Times / USA Today).
The bacteria found in drip trays deserve mention too. The Valencia researchers noted that Pseudomonas and Enterococcus, the two dominant groups, both include species with pathogenic potential, which is why they recommended frequent cleaning rather than occasional rinsing (Scientific Reports).
Scale, by contrast, is harmless. Keurig describes mineral deposits as non-toxic; they just make the machine run badly (Keurig).
What You Will Need
- Mild dish soap
- A damp, lint-free, non-abrasive cloth (Keurig specifically asks for lint-free)
- A soft bottle brush for reservoir corners
- A straightened paper clip, or Keurig’s Brewer Maintenance Accessory for 2.0 and Plus Series brewers
- Keurig Descaling Solution, or plain white vinegar
- A replacement water filter cartridge, if your model uses one
- Optional: Keurig Rinse Pods
- A large ceramic mug (not paper) and access to a sink
Our top picks
Keurig Descaling Solution
Keurig’s own descaler. One bottle is one full descale, and the cycle takes about 45 minutes.
See on AmazonKeurig Rinse Pods
Cleans the brew path, needles, and pod holder in a single 8-ounce brew. Handy after cocoa or flavored pods.
See on AmazonKeurig Water Filter Cartridges
Charcoal cartridges for the reservoir filter handle. Replace every 2 months or 60 refills.
See on AmazonKeurig 3-Month Brewer Care Kit
Descaling solution, rinse pods, and filters in one box, if you’d rather buy once a season.
See on AmazonThe Daily Habit (30 Seconds)
Keurig’s own cleaning sheet has a daily tier that most owners skip (Keurig Cleaning Tips PDF):
- Pull the used pod as soon as it has cooled. Keurig says a pod left in the holder calls for a cleansing brew, and one left for an extended period calls for a full descale.
- Empty and rinse the drip tray if there is anything in it. Do not let liquid sit overnight.
- Run a cleansing brew (a brew with no pod) right after any cocoa, latte, or milk-based pod. Those sugars and milk solids clog needles and feed microbes.
- If you will not brew again for a day or more, empty the reservoir and leave the lid off so it dries. This is NSF’s single biggest recommendation: “keep it dry and keep it clean” (Chicago Sun-Times / USA Today).
If you brew every morning, topping off the tank is fine. Just do not let the same water sit for days.
The Weekly Wash (10 Minutes)
Keurig says the reservoir should be cleaned weekly and the pod holder assembly detached and rinsed weekly (Keurig FAQ; Keurig Cleaning Tips PDF). Here is the full routine, drawn from Keurig’s Use & Care Guides.
Step 1: Power off and unplug. Let the brewer cool. Every Keurig manual starts here.
Step 2: Reservoir and lid. Lift the reservoir straight up and off. If there is a water filter inside, take it out first. Wash the tank and lid with a damp, soapy, non-abrasive cloth, working a soft brush into the bottom corners. Rinse thoroughly so no soap is left to end up in your coffee. Two rules from Keurig that surprise people: do not dry the inside with a cloth, because lint stays behind and can clog the machine, and do not put the reservoir or lid in the dishwasher (Keurig K-Elite Use & Care Guide). Let it air-dry upside down.
Step 3: The filter screen at the base of the reservoir. This small mesh is where biofilm and scale collect. Keurig’s fix: blast it with strong faucet pressure or a sink sprayer, then put about two inches of clean water in the tank and shake it (Keurig K55 Use & Care Guide).
Step 4: Drip tray. Slide it toward you, keeping it level. Separate the plate from the tray, wash both in warm soapy water, and dry.
Step 5: Pod holder and funnel. Lift the handle. Grab the top of the pod holder with one hand and push up from underneath with the other until it pops out. Pull the funnel off the bottom. Wash both in warm soapy water. Caution: there is a sharp needle in the bottom of the holder, so do not stick your fingers inside (Keurig K-Elite Use & Care Guide).
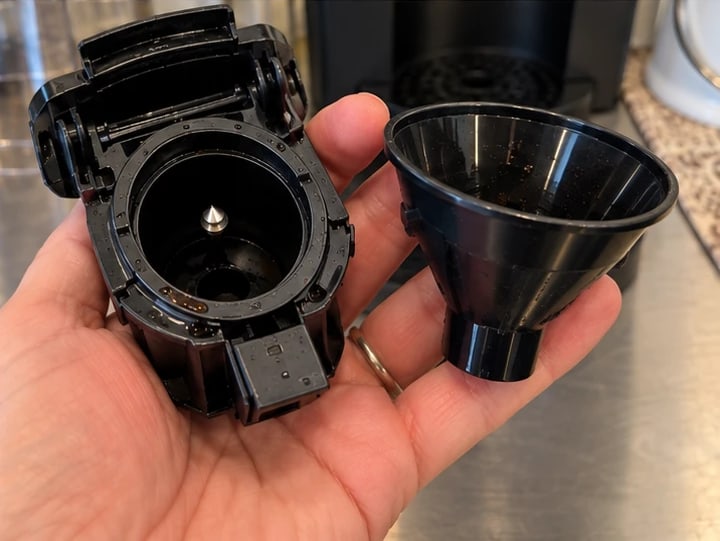
Step 6: Exit needle. With the funnel off, find the needle in the bottom of the pod holder and work a straightened paper clip into it to loosen packed grounds. Rinse with hot water.
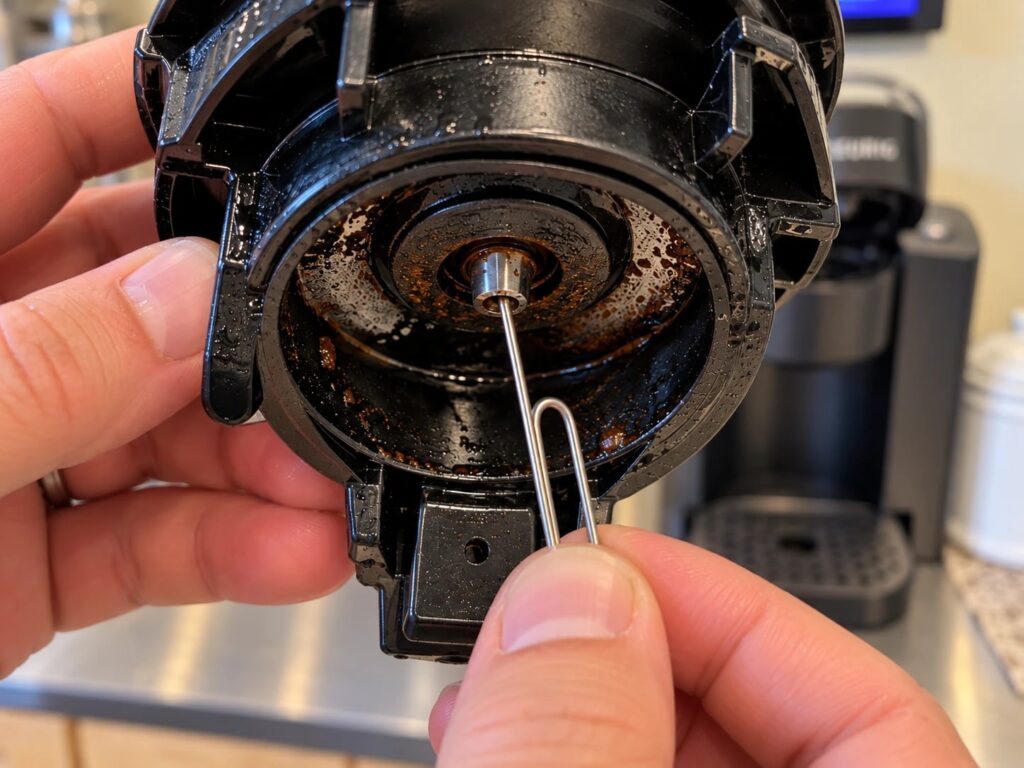
Step 7: Entrance needle. With the handle up, look at the underside of the brew head. Carefully insert the paper clip into each hole in the needle and wiggle it to loosen grounds. Keurig 2.0 and Plus Series owners can use the Brewer Maintenance Accessory instead, which Keurig says fixes most interrupted-brew problems (Keurig FAQ). Our guide to cleaning Keurig needles walks through both needles in detail.
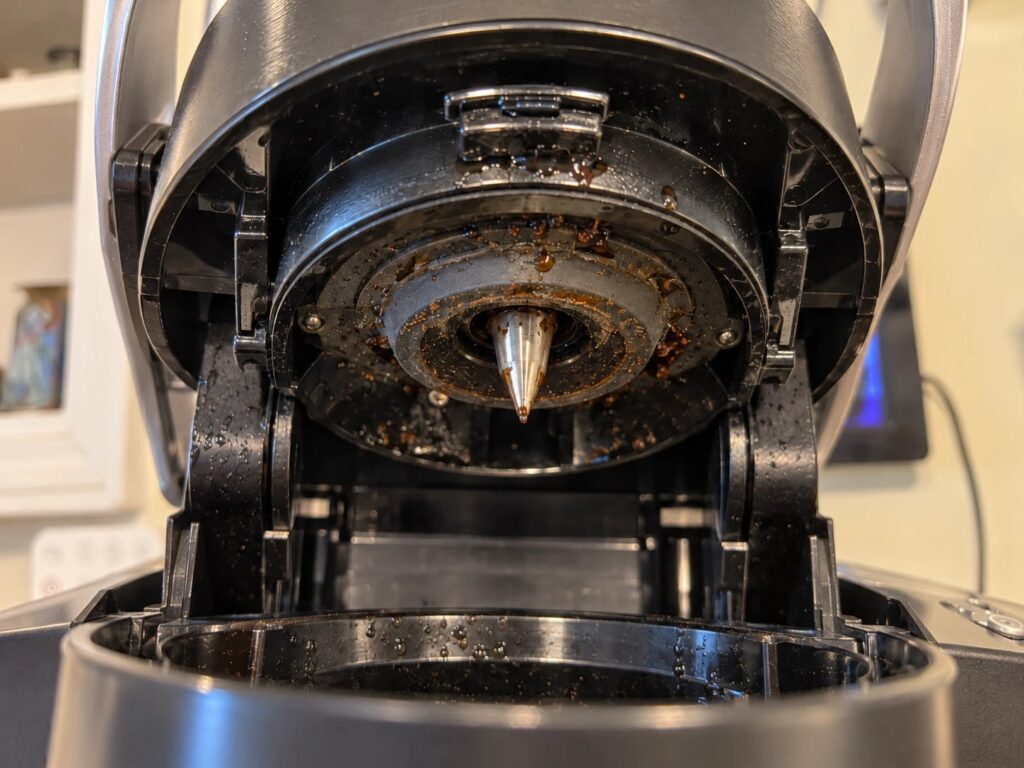
Step 8: Wipe the exterior and the brew head. Damp soapy cloth only. Never immerse the brewer.
Step 9: Reassemble and flush. Snap the funnel back on, seat the pod holder using the two front ribs as guides, replace the reservoir, and run two water-only brews (Keurig K-Elite Use & Care Guide).
Optional Step 10: Rinse Pod. Keurig’s Rinse Pods clean the brew path, including gaskets, needles, and the pod holder, in a single 8-ounce brew. Keurig recommends them weekly, or any time you switch from flavored coffee, cocoa, or tea (Keurig Rinse Pods).
The Quarterly Deep Clean: Descaling
Scale is the calcium and magnesium your tap water leaves behind inside the heating tank and tubing. Beyond slowing the machine down, it creates a rough, porous surface that biofilm clings to and that rinsing cannot reach. Descaling is the only way to clean the parts you cannot see.
Keurig’s guidance is every 3 to 6 months, or sooner if your brewer’s descale light comes on, and more often if you have hard water (Keurig; Keurig K-Elite Use & Care Guide). Some models count brews instead: the K-Express reminds you after 250 brews (Keurig K-Express Essentials Guide).
With Keurig Descaling Solution (about 45 minutes)
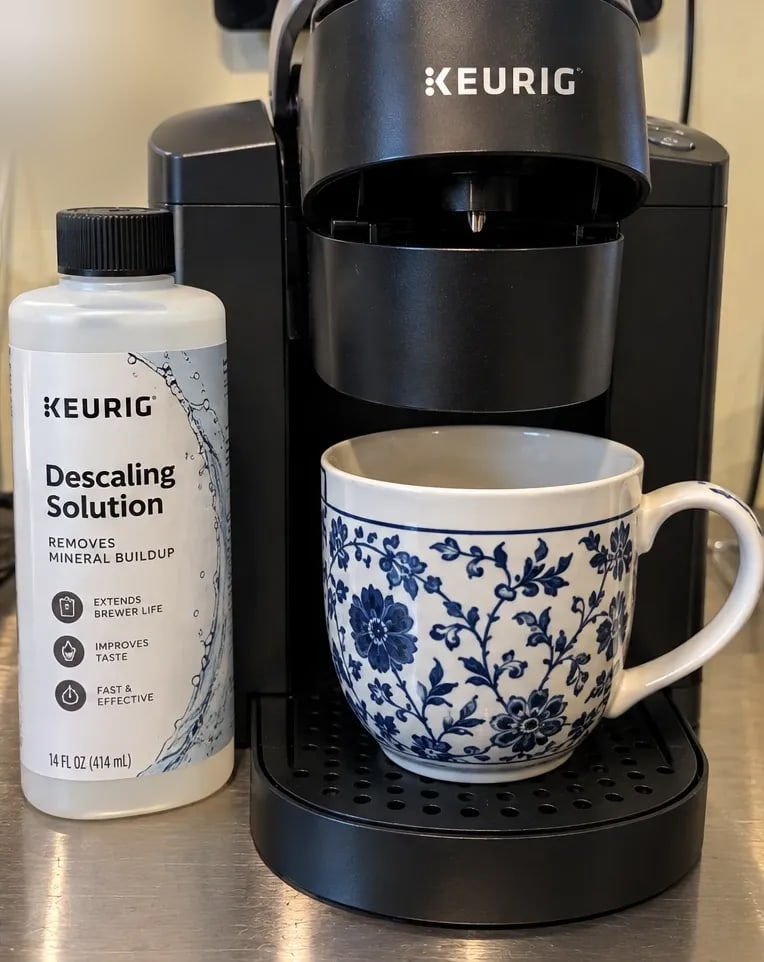
- Empty the reservoir and remove the water filter.
- Power the brewer off. Pour in the full bottle of solution, then refill the empty bottle with water and add that too.
- Power on, set a large ceramic mug on the tray, and run the largest brew size with no pod. Dump the mug. Repeat until the Add Water light comes on.
- Leave the brewer on and let it sit for 30 minutes.
- Dump any leftover solution, rinse the reservoir well, and fill with fresh water.
- Run at least 12 rinse brews at the largest size, refilling the tank as needed.
Foaming during the solution brews is normal; it is the descaler reacting with scale. If a heavily scaled brewer sputters air instead of water, Keurig says to unplug it, rinse out the solution, and run water-only brews until it clears (Keurig K-Elite Use & Care Guide).
With white vinegar
Keurig’s official line is that it recommends its own solution but that “a vinegar solution may also be used” (Keurig FAQ). Keurig’s older vinegar instructions for Classic-era brewers called for 48 ounces of undiluted white vinegar, brewed through until Add Water appears, a 4-hour stand with the brewer on, and then repeated fresh-water brews until the taste is gone (Keurig Descaling Instructions PDF). Plan on two to three extra rinse tanks to clear the smell.
For model-by-model steps and what to do when the light will not turn off, see How to Descale a Keurig (Every Model).
Every Two Months: Swap the Water Filter
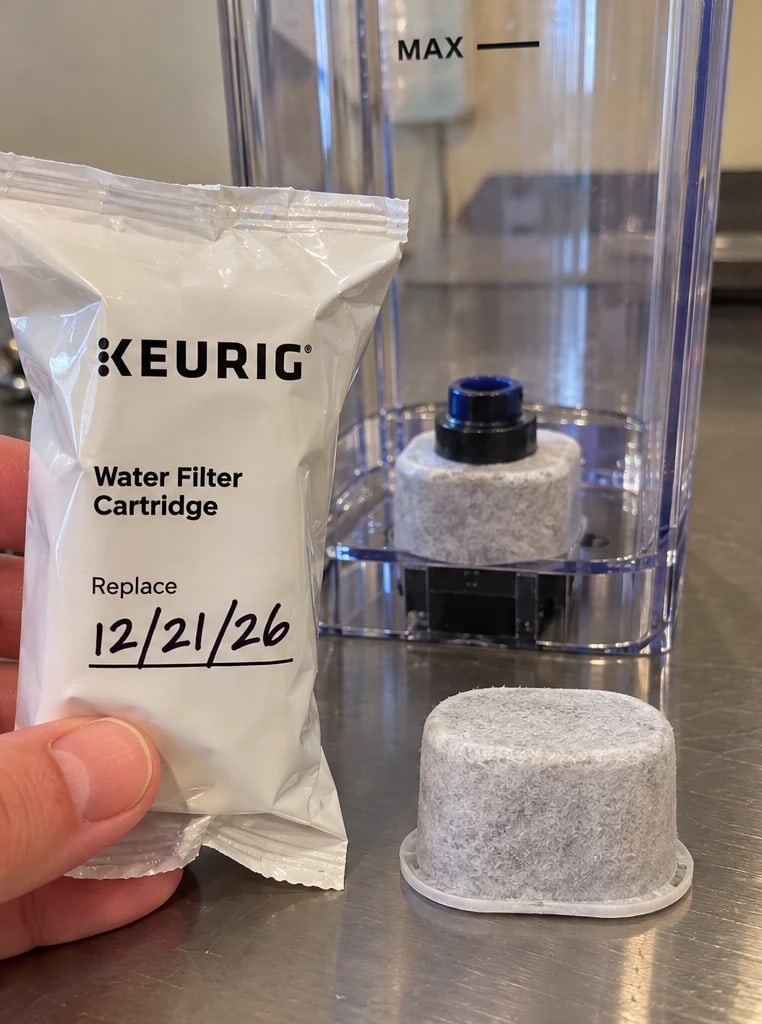
If your reservoir has a charcoal filter handle, change the cartridge every 2 months or 60 tank refills, whichever comes first (Keurig Water Filter Cartridges). Some Plus Series brewers track this for you and flash a “Time to replace the Water Filter” alert after 1,000 ounces or two months (Keurig K575 Use & Care Guide).
To install a new one: soak the cartridge in a bowl of clean water for 5 to 10 minutes, rinse it under running water for about 60 seconds to flush loose charcoal, then click it into the holder (Tasting Table). Wash the filter handle itself while you have it out.
Write the date on the cartridge wrapper with a marker. Two months slips by fast.
What Never to Put in a Keurig
- Bleach, ammonia, or alcohol-based cleaners. They can damage seals and leave residues you will drink (Tasting Table).
- The dishwasher, for the reservoir or lid. Keurig says not to, in both its FAQ and its manuals (Keurig FAQ).
- Distilled water. Keurig’s manuals say to use tap, bottled, or filtered water, but not distilled. Many brewers use sensors that need some mineral content to detect water (Keurig K-Elite Use & Care Guide).
- A towel inside the reservoir. Lint ends up in the water path.
- Soap in the water path. Soap belongs on the removable parts, rinsed off completely. Never run soapy water through a brew cycle.
- The brewer in a sink of water. Wipe the body; never immerse it.
- Coffee, milk, or anything but water in the reservoir. If someone already did, see Put Coffee (or Milk) in Your Keurig’s Water Reservoir?
Already Found Mold? Here Is the Reset
- Unplug, then disassemble everything removable: reservoir, lid, filter handle and cartridge, drip tray and plate, pod holder, funnel.
- Throw away the filter cartridge. It cannot be cleaned.
- Scrub every removable part in hot soapy water with a soft brush, paying attention to seams, the lid gasket, and the reservoir’s bottom screen. Rinse until no soap remains and air-dry completely.
- Clear both needles with a paper clip.
- Run a full descale cycle, including all 12 fresh-water rinses. This is the only way to treat the internal tank. Keurig specifically recommends descaling if a used pod sat in the holder for an extended time (Keurig Cleaning Tips PDF).
- Install a fresh filter, reassemble, and run two or three more water-only brews.
- Smell test. Lift the handle and sniff the brew head. If anything still smells musty, repeat the descale.
If growth is embedded in a cracked reservoir seam or a crumbling gasket that will not come clean, replace that part rather than keep fighting it.
Going Away? Vacation and Storage Rules
- Any absence of a few days: empty the reservoir, leave the lid off, and empty the drip tray.
- Away a week or more: the same, and when you return, rinse the reservoir and run three cleansing brews before your first cup (Keurig FAQ). Keurig also says a brewer that is not used daily should get 3 to 4 cleansing brews before the first serving (Keurig Cleaning Tips PDF).
- Storing it for a month or more: Keurig recommends a full descale both before and after storage (Keurig Cleaning Tips PDF). Store it upright in a frost-free spot, because water left in the internal tank can freeze and crack it.
- About that internal tank: on most Keurig home brewers, once the machine has been primed you cannot drain the internal hot water tank. The exceptions are the K15 and MINI Plus, which drain if you power off, lower the reservoir lid, place a mug, and hold the Brew button until the water stops (Keurig FAQ). Some commercial models have a drain tube behind a rear door. For everyone else, descaling before and after storage is the workaround.
Model Notes
- K-Mini and K-Mini Plus: the rear reservoir is not removable on the original K-Mini. Wipe the inside with a damp, soapy, lint-free cloth, rinse by filling and dumping a few times, and let it air-dry with the lid open (Keurig K-Mini Use & Care Guide).
- K-Duo family: add the carafe and the coffee ground basket to your daily rinse, and run cleansing brews as a full carafe with no grounds (Keurig Cleaning Tips PDF).
- K-Supreme, K-Supreme SMART, K-Elite, K-Café: removable reservoirs, descale reminders on most, and the same paper-clip needle routine.
- Keurig 2.0 and Plus Series: these shipped with the orange Brewer Maintenance Accessory for the entrance needle; it is also sold separately (Keurig FAQ).
- Classic K-Classic, K55, K-Select: no reminder light on some, so put descaling on your calendar.
The Whole Schedule on One Card
| How often | What | Time |
|---|---|---|
| Every brew | Remove the used pod once cooled; run a cleansing brew after cocoa or milk pods | 10 seconds |
| Daily | Empty and rinse the drip tray; empty the reservoir and leave the lid off if you will not brew again for a day or more | 30 seconds |
| Weekly | Hand-wash reservoir, lid, drip tray, pod holder, and funnel; blast the reservoir screen; clear both needles; two water-only brews; optional Rinse Pod | 10 minutes |
| Every 2 months | Replace the water filter cartridge (or after 60 refills) | 10 minutes including soak |
| Every 3 to 6 months | Descale with Keurig solution or vinegar; sooner if the light comes on or you have hard water | 45 minutes (longer with vinegar) |
| Before and after storage of a month or more | Full descale, empty reservoir, store upright and frost-free | 45 minutes each |
Frequently Asked Questions
Frequently asked questions
Can I leave water in the reservoir overnight?
If you are brewing again in the morning, yes. If the machine will sit for a day or more, empty it and leave the lid off so it dries. Standing water is the single biggest contributor to reservoir growth.
Does the hot water kill mold anyway?
Some, not all. Brew water does not pass through the reservoir, lid, drip tray, or the outside of the pod holder at all, and experts say heat is no substitute for cleaning.
Is vinegar as good as Keurig's descaling solution?
For removing scale, it works and Keurig allows it. It takes a 4-hour stand instead of 30 minutes and needs extra rinsing. It is not a disinfectant, so it is not a substitute for scrubbing the removable parts.
My coffee has black specks. Is that mold?
Usually not. It is most often coffee grounds escaping through a clogged exit needle, or flakes of scale. Clear the needles and descale. If the specks are fuzzy or smell musty, treat it as mold and follow the reset above.
The descale light is on. Does that mean mold?
No. It means the machine has detected scale or hit its brew count. Descaling is still worth doing promptly because scale gives mold a foothold.
Is the pink slime in my reservoir dangerous?
It is usually Serratia marcescens bacteria, not mold. It is a nuisance for most healthy people but can be a risk for those with weakened immune systems. Scrub it off, dry the tank, and keep it dry between uses.
About the photos: all photos in this guide are of our own Keurig, taken by Coffee Pod Central. Some have been slightly digitally edited/cropped for clarity.
Sources
- Tasting Table, “Why Your Keurig Is A Mold Magnet – And How To Prevent It” (Oct. 12, 2025): tastingtable.com
- Keurig, “Cleaning Tips for Your Keurig Brewer” (daily / weekly / quarterly schedule, cleansing brews, storage): PDF
- Keurig, K-Elite Use & Care Guide (reservoir, drip tray, pod holder, needles, descaling, storage): PDF
- Keurig, Brewer FAQ (weekly reservoir cleaning, no dishwasher, vinegar, internal tank, Brewer Maintenance Accessory): keurig.com
- Keurig, Descaling overview: keurig.com/descale
- Keurig, Brewer De-Scaling Instructions with white vinegar (Classic-era models): PDF
- Keurig, Water Filter Cartridge Refills (replace every 2 months or 60 tank refills): keurig.com
- Keurig, Rinse Pods: keurig.com
- Keurig, K-Mini Use & Care Guide: PDF
- Keurig, K55 Use & Care Guide (reservoir filter screen cleaning): PDF
- Keurig, K-Express Essentials Use & Care Guide (250-brew descale reminder): PDF
- Keurig, K575 Use & Care Guide (water filter alert after 1,000 oz or two months): PDF
- NSF International, “Germiest Items in the Home” (2011 study): nsf.org
- USA Today via Chicago Sun-Times, “Coffee makers are crawling with germs, mold” (NSF’s Lisa Yakas, University of Arizona’s Chuck Gerba, FDA): suntimes.com
- Vilanova, Iglesias, and Porcar, “The coffee-machine bacteriome,” Scientific Reports (2015): nature.com
- CDC, “Mold: Possible health effects”: cdc.gov
- NDSU Extension, “Red Substance in Tub, Toilet is Bacteria” (Serratia marcescens): ndsu.edu
- Men’s Journal, “How to Clean and Descale a Keurig” (Keurig’s Morgan Lombardi on descaling and hand-washing): mensjournal.com
- House Digest, “12 Steps To Take To Keep Your Keurig Clean And Free Of Mold”: housedigest.com
- Capmesso, “How to Clean a Reusable K-Cup”: capmesso.com